
 ES
ES EN
EN RU
RU SA
SASlack adjuster adjustment is the process of setting the clearance between the brake shoes and the drum by repositioning the slack adjuster arm, ensuring the push rod stroke stays within the legal operating range. If you operate a truck, trailer, or bus with air brakes, checking and adjusting slack adjusters at the correct intervals is one of the most effective ways to prevent brake fade, uneven lining wear, and roadside violations. The key is to know which type you have, measure stroke correctly, and avoid over-adjustment.
Content
- 1 What Is a Slack Adjuster and Why Does It Need Adjustment?
- 2 Manual vs. Automatic Slack Adjusters
- 3 How to Adjust a Manual Slack Adjuster
- 4 How to Check and Adjust Automatic Slack Adjusters
- 5 When to Adjust Slack Adjusters (and When Not To)
- 6 Common Slack Adjuster Problems and Troubleshooting
- 7 Choosing the Right Slack Adjuster for Your Fleet
- 8 Build Slack Adjuster Checks Into Your Maintenance Routine
- 9 Final Word
What Is a Slack Adjuster and Why Does It Need Adjustment?
A slack adjuster is a lever arm that connects the brake chamber push rod to the camshaft of an S-cam drum brake. Its job is to transmit force from the air chamber and convert it into rotation of the cam, pressing the brake shoes against the drum. Slacks need adjustment because brake lining wear increases the distance the push rod must travel, which lengthens the stroke and slows brake response.
When lining wears, the shoes move farther out before contacting the drum. If the slack is too long, the push rod may bottom out, reducing clamping force and leading to unsafe braking. Conversely, over-adjusting a manual slack forces the shoes to drag, causing overheating and glazed linings.
Manual vs. Automatic Slack Adjusters
Manual slack adjusters require regular hand adjustment to keep the stroke within the specified limit. Automatic slack adjusters (ASAs) are designed to self-adjust every time the brakes are applied, maintaining the correct running clearance automatically. However, ASAs are not maintenance-free; they still need periodic stroke checks and inspection of wear parts.
| Feature | Manual | Automatic |
|---|---|---|
| Adjustment method | Rotate adjusting bolt manually | Self-adjusts on brake application |
| Maintenance interval | Check at every PM or 10,000 miles | Inspect at regular PM intervals |
| Typical stroke limit | 1.5 to 2 inches depending on chamber | 1.5 to 2 inches, less after highway use |
| Common failure | Misadjustment, seized threads | Worn internal clutch, seized worm gear |
How to Adjust a Manual Slack Adjuster
To adjust a manual slack adjuster correctly, rotate the adjusting bolt clockwise until the brake shoes contact the drum, then back the bolt off by one-quarter to one-half turn. This creates the required 0.020 to 0.040 inches of clearance between the shoe and drum.
- Chock the wheels and release the parking brake.
- Measure the current push rod stroke with a tape measure or stroke gauge.
- Use a 9/16-inch socket or wrench to rotate the adjusting bolt clockwise until you feel resistance.
- Back off the bolt one-quarter to one-half turn; this is the running clearance.
- Apply and release the brakes several times, then re-check the stroke.
- Recheck stroke length. It should be within the recommended range for your chamber type.
How to Check and Adjust Automatic Slack Adjusters
Automatic slack adjusters should not be manually adjusted as part of routine maintenance; instead, you check push rod stroke and only reset the ASA if the stroke exceeds the limit.
Here is how to check an ASA:
- Park on level ground, chock the wheels, and release the parking brake.
- Apply the service brakes with a full application (about 90-100 psi) and measure the push rod stroke.
- Compare the stroke with the label on the chamber or manufacturer’s spec.
- If the stroke is too long, check the slack adjuster mounting bolts for torque and the clevis pin for wear before replacing the unit.
- Never manually back off an automatic slack adjuster to make the brakes “tighter”; this can damage the internal clutch mechanism.
When to Adjust Slack Adjusters (and When Not To)
Manual slack adjusters should be checked and adjusted during every brake service or every 10,000 miles, while automatic adjusters should be inspected at regular PM intervals rather than adjusted on a schedule.
A common problem in small fleets is “phantom adjustment”: technicians manually adjust ASAs because the stroke looks long, only to find the ASA already reset itself after the next stop. This manual intervention usually over-tightens the unit, leading to dragging brakes and premature lining wear. Only reset an automatic slack adjuster if the stroke exceeds the legal maximum and the cause is a worn internal mechanism, not simple brake application.
Common Slack Adjuster Problems and Troubleshooting
Most slack adjuster failures show up as an out-of-range stroke, unusual brake noise, or uneven lining wear.
- High stroke on one wheel: Check for a loose anchor pin, worn cam bushing, or defective automatic slack.
- Uneven push rod stroke across an axle: Compare left and right sides; a large difference points to seized or worn components.
- Brake drag after automatic adjustment: Clutch inside the ASA may be stuck; replace the unit.
- Rust or seized adjusting bolt: Manual slacks exposed to road salt often seize; replace instead of forcing.
- Clevis pin wear: If the pin hole is elongated, the slack will have excessive free play; replace the pin and potentially the slack.
Choosing the Right Slack Adjuster for Your Fleet
Choose a slack adjuster based on spline size, arm length, and compatibility with your brake chamber and camshaft. Most heavy-duty applications use 10-spline or 28-spline cams with arm lengths from 5.5 to 6.5 inches.
For fleets that still run manual brakes or need a direct replacement, your product catalog should include a complete range of manual slack adjusters with continuous part numbers and factory machining. 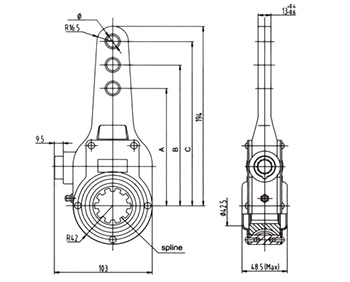 Manual Slack Adjuster for Direct Replacement in FleetsThis manual slack adjuster suits fleets needing a direct replacement or conversion with clear stroke marking and a corrosion-resistant housing for reliable measurements.View Product →
If you are converting to automatic operation or replacing worn ASAs, look for units with a proven internal clutch, corrosion-resistant housing, and clear stroke marking. 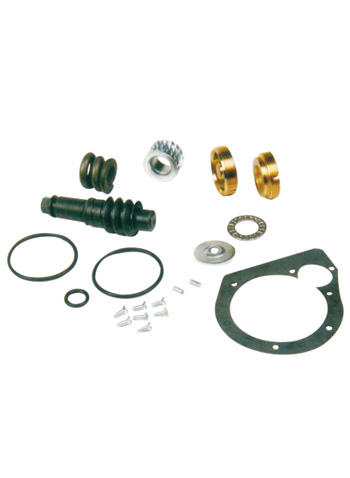 Type 1 Auto Slack Adjuster Repair KitThis repair kit for Type 1 automatic slack adjusters helps maintain stroke accuracy and performance, and pairs with compatible brake chambers for complete service.View Product → An ASA designed for your exact camshaft spline and chamber push rod length will reduce installation issues and keep stroke measurements reliable.
Also check the brake parts lineup to pair your slacks with compatible brake chambers and hardware.
Build Slack Adjuster Checks Into Your Maintenance Routine
Make stroke measurement and brake inspections a fixed line item on your PM schedule. For fleets with manual slacks, record the stroke value for each wheel at every service. For automatic slacks, check the stroke and inspect for oil contamination around the unit. Keep a simple log so you can spot increasing stroke before it becomes a violation.
Use a brake stroke gauge that clamps to the push rod for consistent readings. Perform the measurement at full application pressure, not just a tap of the pedal. If you see a stroke increase of more than 3/8 inch from the previous check, inspect the foundation brake parts before adjusting anything.
Final Word
Slack adjuster adjustment does not have to be complicated if you follow the right method. Manual slacks need disciplined hand adjustment with a quarter-turn back-off, while automatic slacks need correct stroke checks and restraint from unnecessary manual adjustment. Use the right components, check stroke at every PM, and you will keep brakes in compliance and avoid expensive lining and drum damage. When you buy replacements, source from a supplier with a complete line of both manual and automatic slack adjusters, and verify spline size and arm length before installation.

 Contact Us